Monday, September 25, 2017

Puli Sadam aka Tamarind Rice Recipe

During my childhood in JB, our Friday evenings used to be our temple visitation at Sri Muniswarar Temple, Tampoi. Mom mostly went for prayers, I went for the yummy banana leaf dinner and other sweet and savoury offerings. Their banana leaf meal, despite being simple, is unparalleled even by the most famous banana leaf restaurants.

Sri Muniswarar Temple Tampoi is very famous and rich in history, which you can watch here. To this day, their Thaipusam celebration is the most grand in the southern part of our country.

One of my favourite and most fond memory of their offerings is what we used to call 'sour rice', which is actually called puli sadam in Tamil, loosely translated to tamarind rice. Some fun facts here, 'puli' also means tiger in Tamil, it is rather amusing to call it tiger rice, furthermore, it even boosts the colours of a tiger!

And coincidentally, this is also what most Indians would specially prepare for someone who is expecting, among other things of course, but this is extra special as it is sour in taste. Which means I have had good memories of stuffing myself with the sour goodness when I was carrying both the babies.


As the name suggests, it is basically plain rice flavoured with tamarind, and as anything Indian, accompanied by a cocktail of spices. I have not got the exact amount of spices here, but typically it is very small amount about 1 tsp. Usually you don't need a big amount of whole spices to get the taste, so yes, the small amount is sufficient. Here is:

You Need:
2 cups of cooked rice
2 tsp tamarind paste
some roasted peanuts
some curry leaves
some dry chilli
salt
jaggery (I used gula Melaka)
some mustard seeds
some fenugreek seeds
some urad dhal
some oil
some asafoetida
some channal dhal
some turmeric powder
3/4 cup water 
Method:
1) Heat some oil in a pan. Add fenugreek and mustard seeds. Let it splutter.
2) Add the dry chilli,  curry leaves, asafoetida, turmeric powder, urad dhal and channa dhal.
3) Keep stirring till the channa dhal starts to brown.
4) Add the tamarind paste, and add about 3/4 cup of water. If you are using regular tamarind which needs to be soaked first, you don't have to add extra water here.
5) Give it a stir and let it simmer.
6) Add jaggery or as I did, gula Melaka. Check for the taste, and add salt as needed.
7) Simmer till the mixture reduces by half. Now you can add the rice and give a nice stir, halfway turning off the fire, add the roasted peanuts. Keep stirring to get it evenly coated. 


Serve with papadam and yogurt, or just on its own, there are multiple bursts of flavour in your mouth as you savour it. The roasted peanuts, channa dhal and urad dhal really give different experiences of crunch and munch, if there is even such a thing! And then bursts of mustard and fenugreek seeds keeps you rooted to the Indian taste.

Happy trying!

Thursday, September 21, 2017

Cake Indulgence at China House

The silver lining about moving to a new town is every outing is a new experience, and being in Penang, every outing for a meal is like a vacation. There are so many choices here. You want street food, food court, fine dining and franchise (although I do hold some grudge for them having only one McDonald's outlet in Seberang Jaya, and then there is no Burger King around here).

In conclusion, you want to eat, you have it. No questions asked!

Like a few months ago, Mr Hubby visited this cafe that served impressive array of menu, with thousand types of cakes. When he gloated to me about it, I thought to myself it is virtually impossible. And then he goes on and on how it takes from the front part through the back alley right into the row at the back. Again I was thinking, is Penang even that big to have something that sounds so well spread? And then I was told it is actually is a cafe, bar, wine bar, art gallery, has live bands, and like 101 other things.

Curiosity killed the cat, so although I ain't no cat, we had to visit the place right the next weekend, like pronto!

My, oh my! Was I in for a surprise, shock, amazement, whatever you call it, it is not enough to explain the feelings, especially when you love everything cakes. Yes, cake'S'. Here's how:


This is one section, another chilled section on the left, not in pic. And get this, they keep topping up the different cakes and goodies. It's like diabetes galore, diabetes that I want to embrace.

If that this point you are not amazed enough, feel free to leave this space. 

Ok no, please wait, the fun does not stop here.

Their best cake is the tiramisu, and you have the option to take alcoholic and non alcoholic. No prize for guessing which one I jumped upon. It is absolutely a must try! Soft cheesy layer in between soft spongy cakes, topped with icing and what tastes like granola.  


Second best is the espresso walnut cake, the square shaped on the right.

Then there's moist buttermilk chocolate cake, again yummy!

On the top right corner is the salted caramel cheesecake. Too salty for my taste. On the top left is the gourmet hotdog with fries. Things we do to satisfy kids.


Some close ups, from top to bottom is salted caramel cheesecake, espresso walnut and moist buttermilk chocolate cake.


Hope you did not expect me to list out all their cakes, because no I am not doing it, but just mentioning my favourites. As we all are quick to jump onto our food when it arrives, you will notice I have very few candid shots. The more artistic ones are by My Hubby who takes pride in the Iphone6 skills.


Also thanks to my non-photographic skills, the accounts and photos here are actually compiled from our multiple visits there. 

If you noticed, our table came with square white papers, sophisticatedly known as 'mahjong papers', and every table is equipped with good amount of crayons. Basically they tap into your creativity as you see heaven in every bite of their God-sent cakes.

Thanks to our gastronomically superior experiences we've produced quite a few masterpieces while indulging, especially the kids, and oh, notice the red velvet cake as you immerse yourself into the art.


Tiramisu, chocolate decadent and red velvet cakes, at your service!


Art too.

See how all the hands get into producing art.


And the best art award has to go to the portrait My Hubby created, full credits to him, Iphone only took the picture. So that's me, as conceived by Mr Hubby.


The selected artworks will be displayed at their cafe and also the art gallery, and seeing the collection they have there, people are pretty creative and arty after their cakexperiences. The last time we went there I tried to spot my portrait but couldn't find it. Looks like we need another trip to China House to indulge and submit another artwork!

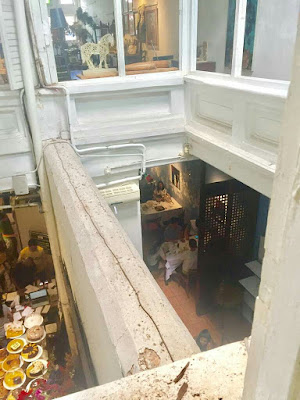
Here's Mr Hubby pulling more Iphone6 tricks, an ariel view from the art gallery on the second floor. I am sitting on one side and there are cakes on the other side.


Taking a walk from the front to the back is really an interesting experience because the deco, the setting, and the graffiti brings you into different moods, ambience, and that vintage feel that you forget for a short while that you are in the 21st century.


And here's some of our pics. My Hubby was doing the beard trend, till the cakes got into them. Not bad if you want to have some cakes to-go!


The boys and me, right before we leave the place. I can't tell if my eyes are opened or not, regardless, awesome cakes, I was probably high on cakes!


So now you know, if you are in Penang where are the best cakes. In fact, once you've had China House cakes, everything else just pales in comparison. One might feel the pricing in on the higher side, but the pieces are oh-my-big-enough-to-drown.

China House is addictive like that. Try it, if you dare!

Chicken Butter Masala Recipe

Here's me finally updating the Chicken butter masala recipe from 2 weeks ago. It goes awesome with homemade naan or just some plain basmati or regular rice.


Ingredients
  • 500g chicken breast
  • 100g yogurt
  • 2 tsp garam masala
  • 4 tsp ginger garlic paste
  • 2 tsp chilli powder
  • 2 tsp cumin
  • 2 tsp coriander
  • 2 tsp turmeric
  • 50g butter
  • 1 tbsp tomato puree
  • one, diced onion
  • cardamom pods
  • 1tsp ground cloves
  • 1 cup milk
  • handful chopped coriander
  • to taste salt
  • some cooking oil
Method
1. Cut the chicken breast in bite-sizes.
2. Add the 100g yogurt, 1 tsp garam masala, 2 tsp ginger and garlic paste, 2 tsp chilli powder, 1 tsp cumin, 1 tsp coriander, 1 tsp turmeric and some salt. Mix well and marinate for 30 minutes to an hour.
3. Add cooking oil into a skillet, and pan fry the marinated chicken breast pieces. Set aside.
4. In the same skillet, add the 50g butter. Add the diced onion and let it sautee. 
5. Add the 1 tbsp tomato puree, 2 tsp ginger and garlic paste, cardamom pods, 1 tsp ground cloves, 1 tsp cumin, 1 tsp coriander, and 1 tsp turmeric.
6. Add about 1 cup of water and let it simmer. Add salt to taste.
7. Add 1 cup of milk and simmer it till it thickens. You can add more water and/or milk to get tour desired consistency and amount of gravy.
8. Sprinkle chopped coriander leaves and serve.


I gotta warn you, the moment you are done pan frying the pieces of meat, you can try some, and after that you will not be able to stop yourself. In this case, it is really wise to prepare a little extra to ensure you have enough for the dish later.

Happy trying!

Sunday, September 10, 2017

Cheese Garlic Naan Stovetop Recipe

I love to eat roti or pratha. Naan and even kulcha for that matter. And no, it is not the same as the regular roti canai you get locally in Malaysia. Even most of the capatis found locally is not the real deal, so you get what I mean.

It was a while since I cooked on a Sunday, and that butter chicken recipe I found online was calling out to me, so it was the perfect way to spend my Sunday morning with. Also I was craving for a real good naan. Most of the naan we get outside are either overpriced or too dry. I wondered what it took make naan at home.

I'd like to emphasize that this time I was wondering how to make naan at home, for real, and not from accidental dough that did not rise. In case you are wondering what am I talking about, 3 years ago, my yeast failed me, and the cinnamon roll dough did not rise, so I made 'em into naan, blog link here.

Thanks to that mishap I learnt that I should always always and always activate my yeast before kneading, blog link here. Secondly I also learnt that those dough can work so well as stove top flatbreads.

It was definitely something that can be done. I took a while searching recipes and methods online. Mostly used baking method with hot cast iron or baking tray for the 'tandoor' effect, however it did not seem very convenient with the steps, and I was also vary of burning my hands with the constant 'turning' over of the naan, and I have a good amount of previous scars from the oven already.

I decided to use my capati cast iron flat pan, or as we call it, the 'tawa'.


Here's the recipe I finally used, with awesome results! My recipe is for breadmaker kneading, as much as I hate manually kneading, I also don't fancy the detailed write-ups of manual kneading. Luckily for me the BM does it till it rises the first time.

You need:
For dough
4 cup of all purpose flour
1.5 cups of warm water
1.5 tsp yeast
some salt
1 tbsp sugar
3 tbsp plain yogurt
2 tbsp butter
For filling and topping
mozzarella cheese, shredded, or cut into small blocks
chopped coriander
chopped garlic
2 tbsp butter, melted
Method:
1) Activate your yeast by mixing it with warm water and 1 tbsp sugar. Let it sit for 10 minutes and if it foams, it is ready to go.
2) Add the activated yeast with the rest of the ingredients (except butter) into the breadmaker and start it on kneading mode.
3) Once its incorporated, add in the butter and let it continue kneading till the machine stops for first proof.
4) Let it proof for 1 hour.
5) In the mean time, melt the 2 tbsp butter. Mix chopped garlic and coriander into it and set aside.
6) Once the first proof is over, oil a flat dish to store individual dough.
7) With an oiled hand, start forming smaller dough about 3 inches wide each, fill the dough with mozzarella cheese and seal it into a nice round ball. Place the dough balls onto the oiled flat dish.
8) Start to heat up the cast iron pan. Oil the surface slightly to avoid the first dough from sticking.
9) On an oiled surface, place individual dough press down with your palm to form into flat circles. You may notice it tears up creating holes, it is fine to leave it so.
10) Place the flat circle gently on the hot pan, and let it toast for 1 mins plus.
11) You will notice bubbles forming, this is good sign.
12) Turn it over and brush the butter/garlic/coriander mixture on top of it.
13) This time cover the naan with a small cover right for it's size. Let it toast for 2-3 minutes.
14) Repeat steps 9-13 for every dough ball.

It is rather lengthy but it actually is very simple, just the few extra steps from making capati, one reason why I enjoyed making it so much and will do again next time!


We had the naans with butter chicken masala, mint coriander chutney and sliced raw onions. At the risk of sound immodest I have to say that these are the best naans I had, even better than chewy and dry ones you get at most restaurants. I am surprised with the soft outcome of this pan toasted naan. The earlier accidental dough that I made into naans were more fluffy thanks to the egg content.

I had kept aside some of the dough, and had some leftover butter chicken, which later in the evening I upscaled them into pizza naans! I had also included the butter herb mixture into the pizza base.


Happy trying!

LinkWithin

Related Posts with Thumbnails