Wednesday, March 29, 2017

Instant Rava/Suji Idli Recipe

When we were expecting Sanju, like 8 years ago, we used to visit the Klinik Kesihatan at Tengku Kelana in Klang. Nearby there was this Indian restaurant that had these lovely idlis. They were orange in color. For a while I had no idea what idlis were those, but through time, I got to know those were rava idlis.

Fast forward to present day, I've recently got myself the idli steamer, and yes, I am like the girl with a new toy, eager to play with it. Initial plan was to make idlis, but since idlis require overnight fermentation, I was not able to get the plan in work. However, I remembered seeing the rava idli recipe, which is also touted as the instant idli recipe. Do not fall for the instant word, although it does not require overnight fermentation, it is not really instant per say.

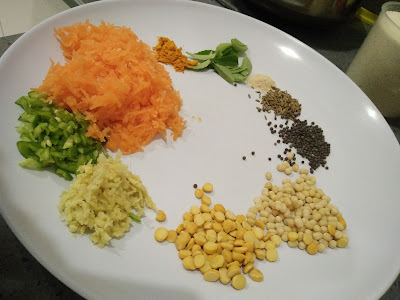
For the first time ever I felt compelled to arrange the spices and other ingredients on a dish before cooking. Of course most Indian dishes require more than 3 spices, but this one was extra special with the uses of channa and urad dhal in the tempering. Also, from my past experience it was good to arrange them out to avoid risking forgetting one item. It makes me feel so bad when I leave one spice item out, makes the dish feel incomplete.


You will notice a lot of the spices are just estimation, can take this picture for reference of how much my 'some' is.

So here's listing out the ingredients.

We need:
1 cup rava/suji/semolina
1 cup yogurt
some water

some turmeric powder
some curry leaves
some asafoetida
some cumin seeds
some mustard seeds
some urad dhal
some channa dhal 
some ginger, grated
green chilli, chopped fine
1 carrot, grated
cooking oil
salt
1/4 tsp baking soda

Method:
1. Heat up some oil in a pan. Sautee cumin, mustard seeds and asafoetida till it pops. 
2. Add curry leaves, urad and channa dhal. Let it sautee for 3-4mins.
3. Add green chilli, grated ginger and carrot. Add in the turmeric powder and salt. Sautee for 3-4mins.
4. Add the rava and give a good stir while it roasts for about 5 minutes.
5. Turn off the heat and let it sit till it cools down.
6. Once its cooled, you can add the yogurt, and stir it well. Add some water to get the idli consistency.
7. Let it sit for 20mins.
8. Add the baking soda and stir it well. Immediately scoop the batter onto the idli moulds and steam for 10 minutes.

You can serve it will dhal, curry or the variety of chutneys. I made onion coconut chutney. This recipe yields about 20 regular sized idlis.

The idlis are so soft and fluffy, with grainy texture of suji. Just brings back thousands of memories of eating suji halwa. The best thing is it was even a hit with the picky eater Jeev. One thing for sure, it tasted good even on its own. I should have just added more water.


It is actually similar to this rava uttapams I made last year. Rava uttapams are pan toasted, while this rava idli is steamed. They both can have more vegetables and seasonings added.

The next mission is to make fluffy idlis with spanking fish curry, till then, stay tuned!

Wednesday, March 22, 2017

Honey Roasted Cashew Nuts Recipe


When you want to have it all... on a quiet afternoon.. it is snack time... you need some snacks, the same time nothing junk. You want some power food, slightly sweet and salty, perfect to go with your ginger tea. You can always buy something off the store, but it would be more cost effective making it at home, using quality products you know it won't be the same as getting from the store.

Granolas are my all time favourite snacks that work any time of the day, especially at night, guilt-free. This time for a change, I really wanted to try this honey roasted cashew nuts recipe I always see online instead. I had just purchased my usual cashew nuts supply in bulk from the local wholesaler. It was indeed the perfect power-food snack in that moment.


You need to prepare a sauce of honey and all things nice to coat the nuts before roasting it in the oven. Melt 2 tbsp of butter in the microwave oven. Add in equal amount of honey, a small drop of vanilla essence, some salt and 1 tsp ground cinnamon. Give it a nice stir till it incorporates together. 

Next pour this mixture over a bowl of raw cashew nuts, and coat it well. Spread this on a baking sheet, bake at 160C for 20-30 minutes, stirring the cashew nuts halfway.


Once done, remove it into a clean bowl. Toss with 2 tbsp of brown sugar and some salt. Let it cool and stir often.


And now, you are ready to munch! You can never go wrong with the wonderful golden colour.

After making this first batch, I realise there are some things that can be improved. For next batch, I'd make less of the honey-butter mixture, because, eventually they are only needed to coat the nuts, and the excess is wasted on the baking sheet. Also being too wet hinders it's roasting process. I also felt the vanilla essence aroma was a little too strong for my liking, I would like to skip it next time and it would still be just as good.


But I must warn, once you munch, you can't stop! No offence Pringles!!


Cheesy Garlic Bread Recipe


We love cheese. We love garlic. And we love bread. With no doubt, cheesy garlic bread spells nothing but gastronomical success. I saw this Hebbar's recipe many moons ago on Facebook, and as soon as I had the chance to try it, I jumped right into it.

It has all the right aromatic ingredients and herb I love, yes its cilantro, coriander, or Chinese parsley as you may call it. And the way we make the marks, it just makes it so easy to pick up your pieces and savour them as you like.

The recipe has 3 parts, the dough, the garlic butter spread and then the filling:

1. For the garlic bread dough:
1/4 cup warm milk
1 tsp dry yeast
1 tsp sugar
some salt
3 cloves of garlic, chopped
some dried oregano
1 tsp butter
1 cup all purpose flour

2. Garlic butter
1/4 cup butter melted
3 cloves garlic chopped
2 tbsp coriander leaves chopped

3. For filling
some mozzarella cheese
some chili flakes, dried oregano, mixed herbs

Method:
1) Activate the yeast in warm water and sugar. Follow method here. Mix activated yeast with the rest of the ingredients, except the butter, and knead till mixed. Add the butter and knead well like any other dough. Let it proof for one hour.
2) Mix the items in part (2) together.
3) After proofing, roll the dough out in a circle. Spread ingredients from part (2).
4) Top with mozzarella cheese, some oregano and chilli flakes.
4) Fold the dough and seal the edges.
5) Brush the remaining garlic butter on the dough and top with more herbs and chilli flakes.
6) Make marks over the bread without cutting it through.
7) Bake at 180C for 15 minutes.

The recipe makes 1 semi circle garlic bread. You can also top the bread with some parmesan cheese. Just adds to the divinity of it.

I made 2 versions, with mozzarella cheese filling and another with pasta sauce and cheese filling. The latter tasted much better and made the former really lacking in salt. In future I'd add more salt or I guess just more cheese in the plain version.

Also you can vary, or omit the chilli flakes and dried herbs altogether.


This never goes wrong, makes perfect snack, or meal, if you will! Happy trying!

Tuesday, March 14, 2017

Getting The Thosai Experience

For a long time hubby was asking me to make thosai and why not, we all love thosai. Usually I like to make trips to Indian restaurants just to get their awesome thosai with the chutney that come in the side. Of course not all shops have the same taste, so you really got to choose the best to stay loyal to.

The only reason I was putting making thosai was the fact that it takes one day of prep before actually making it, unless you want to go instant, but really it will not have the same effect. You can say I was just procrastinating all this while and never made it, that is till now.

So I told myself, that's it. If I can make everything else, why not the thosai which I love so much? 

Firstly it was all about getting a good recipe, and my friend recommended me Yummy Tummy for thosai, chutney and everything Indian delicacies. Next I went to the Indian grocery store to get the ingredients, and cooking time it was!

On the day before I got soaking the urad dhal and idli rice. Soon after it was time to blend it and leave it for fermentation. Sounds simple enough right, sure it would have been, if my blender motor did not break down.

Yes, I repeat, my blender motor broke down, died on me, bluek. Ok mostly it is my fault for not realizing it needs to be given short pulses and not long minutes of blending. It have the tendency of killing most of my electrical appliances by overworking them this way. True story.

So, it gave up on me, stopped working, and I was stuck. At this point I wished I had the manual grinder. I looked for second option, I had my old Panasonic motor, but no jug. The jug broke long time ago but I did not get to buying the replacement because I was too engrossed in using the Magic Bullet all the while. Also it seemed hard to get replacement jug at the common hypermarkets.

Then I took out the Kenwood food processor that has been neglected, like forever. But I knew this was a long shot, for food processors only do dry processing, not wet one. And true enough, the batter remained coarse, it did not budge!!

Then I thought to myself, I should just drive out to the nearest electrical store and reward myself with a brand new blender set. In all this chaos, I did notice the familiar smell of urad dhal fermenting that engulfs the home whenever making thosai or idli. I quickly gathered the kids, and we set out. 

Once there, for some reason, I asked the salesperson if they had just the jug for Panasonic blenders. It was no surprise when he said no, but he continued telling me it is available at the Panasonic service center. The best part was it was barely 5 minutes away, and as it was still office hours, I'd still make it to get one!

We quickly dashed there, grabbed the jug, came home feeling accomplished, accompanied by the familiar sour smell of fermentation. And that's how I got my thosai batter fermentation right, kids! And lot's of clean up afterwards too.

Here's the recipe to the thosai batter:

Soak 2 cups of idli rice and 1/2 cup of urad dhal, with some fenugreek seed. Leave this for 4-6 hours. Strain the water away, and blend this till fine, adding cold water as needed. After this we just let it ferment on the table top overnight. Wait for the batter to expand as it ferments, make sure you place it in a container only half full. And voila!


Making the thosai on the pan is rather tricky, takes a while to get the shape right. The pan cannot be too oily or too dry, otherwise the shape might not turn out right.


At last, I managed to make some decent shaped thosai(s).


As for the chutneys, I made 2 versions, one green, another red:

1) Coriander Coconut chutney by blending grated coconut, coriander leaves, green chilli, salt and garlic, and giving it a nice tempering of mustard seeds, urad dhal and curry leaves

2) Channa dhal chutney by tempering some channa dhal, mustard seeds, urad dhal and dried chilli, and then add chopping red onions and tomatoes. Let them soften and cook a while, season with salt and pepper. Once cooked, cool down, and blend it.


The sous chef decided we needed some sardine curry, and here's the masterpiece, with lotsa onion, chilli and truckload of curry leaves.


I also had the kid lending his hands to meddle with the turner.


For the finale, it is essential to seek better photography skills, so I let the sous chef take over to get a nice shot of the breakfast meal. Obviously we ate with damn lot of chutney and more chutney!!


Wednesday, March 1, 2017

Battle Of The Batters - Onion Rings Done 2 Ways

The kids have been asking for onion rings for a while now. Usually I'd just bring them to Burger King, and get some burgers and onion rings on the side. Not this time though, due to the place we are staying now has no Burger King outlet, and the nearest would be across the bridge, so I decided to go homemade.

I found a few recipes using flour batter, and looked more for the classic breadcrumb style as well, because you have to admit, nothing beats the classic crunch of onion rings. It sounded really simple, like those homemade chicken fingers, get the marination/batter, dip and dip and maybe dip some more, deep fry and you are done. 

And I was about to find out the truth, it was not that simple!!

Ok firstly, lets go through the dippings. In one bowl prepare onions cut into rings (duh!), I used 3 onions, and boy, were they really a lot. In one bowl, prepare 1.5 cups of bread crumbs. In the second bowl, about 1 cup of flour, some salt, black pepper, ground cumin, oregano, paprika and chilli powder. In the second bowl is the mixture of 2 eggs and 1 cup of buttermilk, whisked together.

In the next step, get an assistant, it can be your kid, husband, or anyone. Arrange them out nicely, because this is the last step that you get to see your workspace all clean.

See, I got my little eager mc-beaver minion to help me. It gets really messy, I must warn you. But no, I am not showing the after picture, too dreadful for an OCD like me.


The first style of onion rings - classic breadcrumb crunch - you dip the onion rings into the flour mixture, then into the egg mixture, and lastly into the breadcrumbs, making sure you coat nicely at every step, and you can lay them out till you are ready to fry. Deep fry for 3-4 minutes and you are done.

Halfway making the breadcrumbs type, I kept asking myself, why did I sign-up for this, I could have just bought frozen ones and fried for the kids to munch on. Then I reminded myself, yes, I am always up for new culinary challenges. That is when it got too tiring, breadcrumbs were running out, and I decided to mix the flour with the egg mixture and voila, you have got the flour batter! True Story.

The kid, however, was having tonnes of fun, dipping and re-dipping, hiding onion rings in the flour/batter, it was like treasure hunt for me.


For the second type, just mix the flour mixture into the egg batter, get it nicely incorporated, add water if its too thick. And mix in all the onion rings. Separate them as you fry them, again for 3-4 minutes. When I got my hands into the batter, I had this familiar feeling which I later realised the batter and aroma was almost like pakoda aka Indian vegetable fritters, except we'd have gram dhal and more spices into the batter. So effectively I was making Western version of pakodas!


The final verdict is both were super-yummy! The breadcrumbs version slightly more oily, and it soaked the oil much more than the other one. Also I wished I had put in more spices and have it pakoda style, which is what I am going to do next time.


The rest of the dinner yesterday was a huge platter of bacon pizza, focaccia, cheesy garlic bread, and the onion rings. Don't be afraid to pile on vegetables on your pizza, no one really notices that, and eat away!

The ideal title for the dinner would be western pakodas and rotiyan (I hear you LOL out there!).

Too many carbs you say? Jillian Michaels is gonna make sure I burn it all off the next day! Bon appetit!


LinkWithin

Related Posts with Thumbnails